OS X RVM
Paso 1: Abrir Terminal
Paso 2: Instala un Compilador (XCode o GCC)
Ir a Instala Xcode
Paso 3: Instala Homebrew
Type this in the terminal:ruby -e "$(curl -fsSL https://raw.github.com/mxcl/homebrew/go)"Verificar
Type this in the terminal:brew -vApproximate expected result:Homebrew 0.9.4El texto en gris puede diferir y no importa.

Paso 4: Instala Git
Type this in the terminal:git --versionApproximate expected result:git version 1.x.xEl texto en gris puede diferir y no importa.De otra forma, escribe esto en la terminal:brew install gitVerificar
Type this in the terminal:git --versionApproximate expected result:git version 1.x.xEl texto en gris puede diferir y no importa.
Paso 5: Instala RVM, el organizador de versiones de Ruby
Paso 5.1: Instala RVM
Type this in the terminal:curl -L get.rvm.io | bash -s stablePaso 5.2: Configura tu shell
Verificar
Type this in the terminal:type rvm | head -1Expected result:rvm is a functionType this in the terminal:rvm -vApproximate expected result:rvm 1.x.x (stable) by Wayne E. Seguin (wayneeseguin@gmail.com), Michal Papis <mpapis@gmail.com> [https://rvm.beginrescueend.com/]El texto en gris puede diferir y no importa.
Paso 6: Configura RVM para usar Homebrew
Type this in the terminal:rvm autolibs homebrew
Paso 7: Instala Ruby
Type this in the terminal:rvm install 2.0.0Type this in the terminal:rvm use 2.0.0 rvm --default use 2.0.0Verificar
Type this in the terminal:ruby -vApproximate expected result:ruby 2.0.0p247 (2013-06-27 revision 41674) [x86_64-darwin13.0.0]El texto en gris puede diferir y no importa.Solución de problemas
Paso 8: Instala Rails
Type this in the terminal:gem install railsVerificar
Type this in the terminal:rails -vApproximate expected result:Rails 4.0.xEl texto en gris puede diferir y no importa.
Paso 9: Instala Sublime Text 2
Paso 9.1: Descargar Sublime Text 2
Paso 9.2: Seleccionar "Open with DiskImageMounter" en el cuadro de diálogo
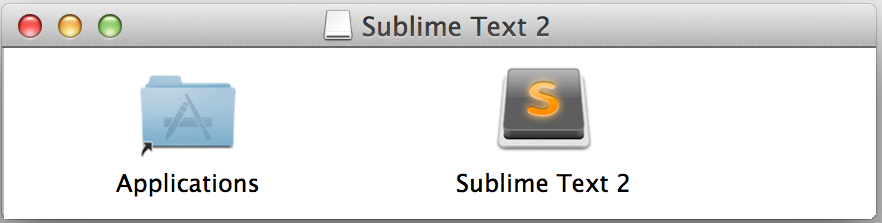
Paso 9.3: Arrastrar Sublime Text 2 en tu carpeta Aplicaciones.
Paso 9.4: Desmontar el instalador
Verificar Instalación exitosa
Type this in the terminal:git --versionApproximate expected result:git version 1.x.xEl texto en gris puede diferir y no importa.Type this in the terminal:which rubyApproximate expected result:/Users/alex/.rvm/rubies/ruby-1.9.3-p290/bin/rubyEl texto en gris puede diferir y no importa.Type this in the terminal:which railsApproximate expected result:/Users/alex/.rvm/gems/ruby-1.9.3-p290/bin/railsEl texto en gris puede diferir y no importa.
Siguiente Paso:
Ir a Configura Git
Regresar a Macintosh%23step2 1